Ticket Lifecycles
By default, RT comes with ticket statuses that work for many types of workflows: new, open, stalled, resolved, rejected, and deleted. But there can be any number of workflows where these status values don't completely fit. RT allows you to add new custom status values and define their behavior with a feature called Lifecycles.
Using the lifecycle web editor
As an RT admin you can go to Admin->Lifecycles to edit and create lifecycles via the web interface.
The web interface allows for easy visualization and editing of lifecycles.
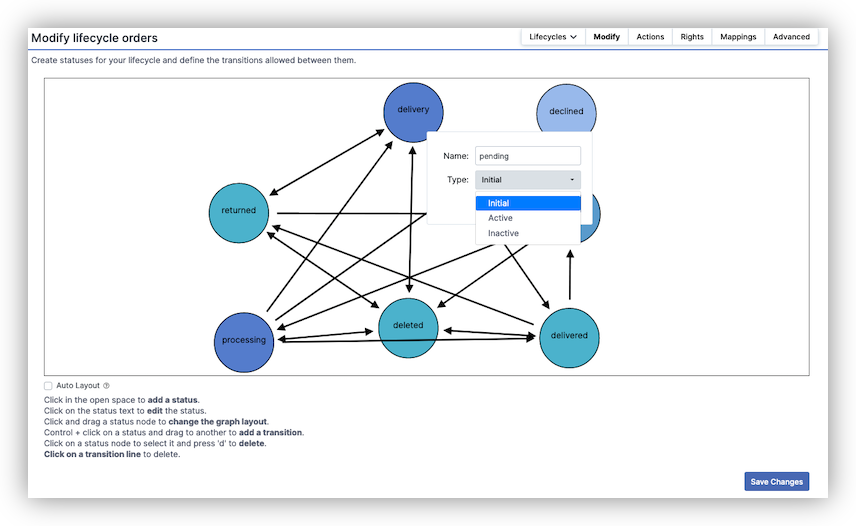
Editing statuses, transitions and categories
Instructions for interacting with the web UI lifecycle builder can be found on the main "modify" page. The modify page allows for create and deleting statuses, adding transitions between statuses with drag and drop arrows and changing the categories of a status (initial, active and inactive).
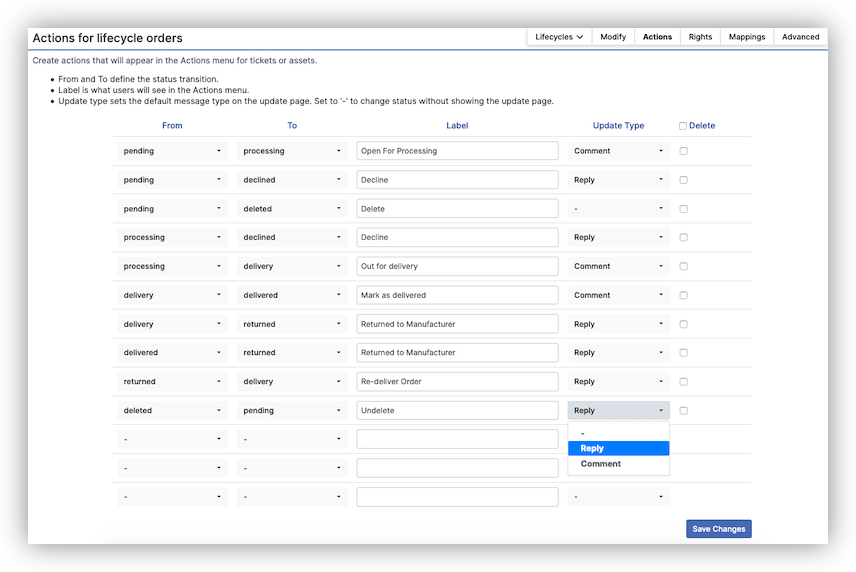
Actions
The actions tab allows for the easy editing, creating and deleting of actions. Actions are the options in the "Actions" drop down on ticket pages.
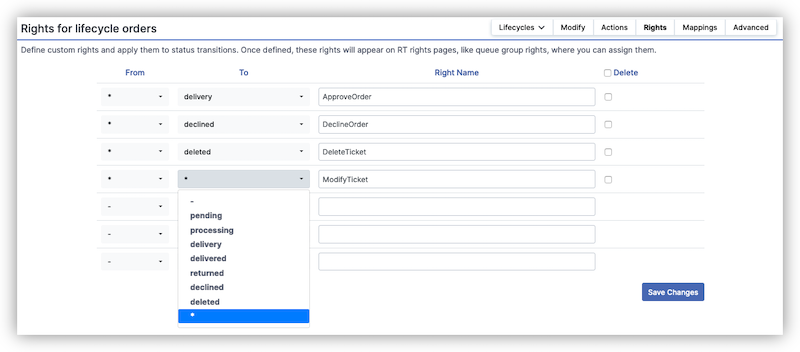
Rights
Create, edit and delete custom rights for status transitions using the Rights tab.
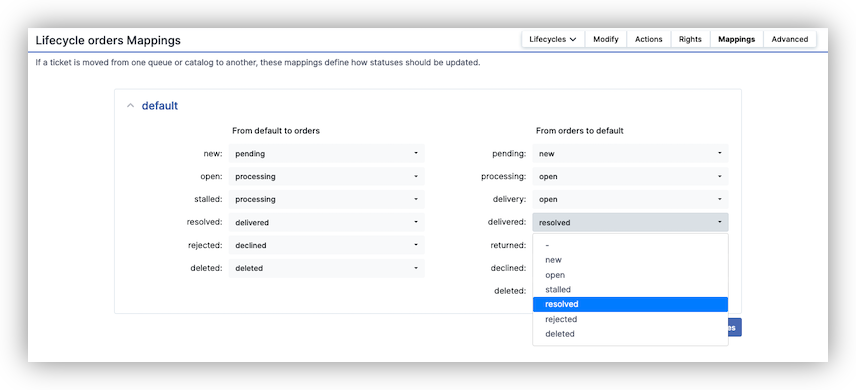
Mappings
The mappings tab allows for the mapping between the current lifecycle and the other lifecycles to be defined. This is needed when moving tickets between queues with different lifecycles.
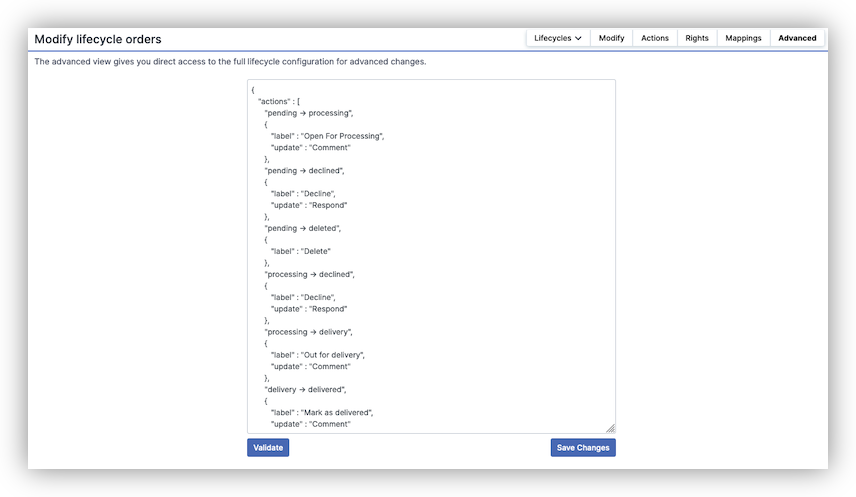
Advanced
Edit the configuration as JSON. This allows for more advanced lifecycle features that are available via setting the config on file to be utilized.
Using the site config file
Adding a New Status
Because Statuses are controlled via lifecycles, you must manipulate the entire lifecycle configuration to add a status. In earlier versions of RT new statuses could be added by adding a new element to an array in RT's config file. But because lifecyles are built around statuses, the entire lifecycle configuration must be modified even if you only need new statuses.
Copy Lifecycle Config
First, copy the %Lifecycles hash from RT_Config.pm and paste it into RT_SiteConfig.pm.
Add Status Value
Add the status to the set where your new status belongs. This example adds approved to the active statuses:
active => [ 'open', 'approved', 'stalled' ],Update Transitions
Now the transitions section must be updated so that the new status can transition to the existing statuses and also so the existing statuses can transition to the new status.
    new      => [qw(    open approved stalled resolved rejected deleted)],
    open     => [qw(new      approved stalled resolved rejected deleted)],
    approved => [qw(new open          stalled resolved rejected deleted)],
    stalled  => [qw(new open approved         rejected resolved deleted)],
    resolved => [qw(new open approved stalled          rejected deleted)],
    rejected => [qw(new open approved stalled resolved          deleted)],
    deleted  => [qw(new open approved stalled rejected resolved        )],
Order Processing Example
This guide demonstrates lifecycles using an order fulfillment system as a real-world example. You can find full lifecycles documentation in "Lifecycles" in RT_Config.
As with all RT custom configuration, if you are customizing the RT lifecycle, make your changes in your RT_SiteConfig.pm file, not directly in RT_Config.pm. If you are adding a new lifecycle, you can add a new entry with:
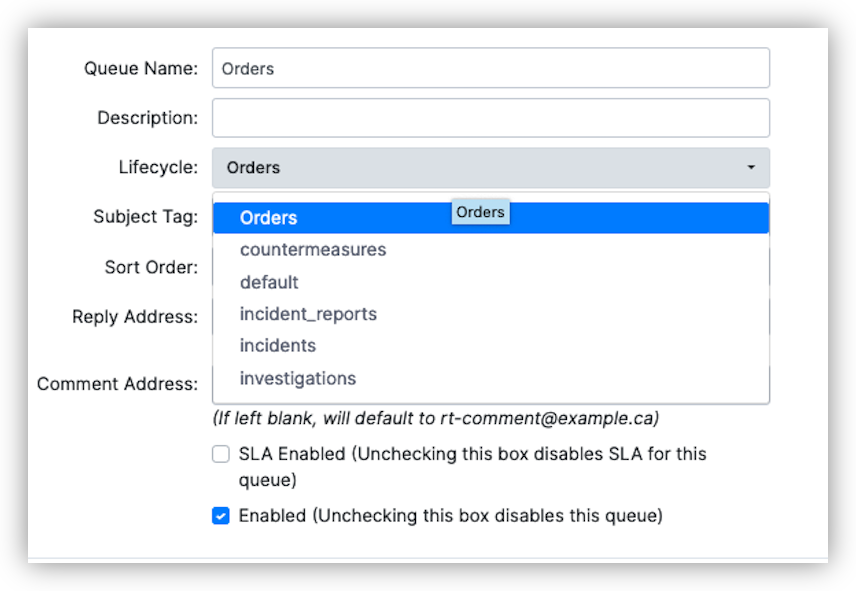
Set(%Lifecycles, my_new_lifecycle => { ... } );The detailed configuration options are discussed below. Once you add it and restart the server, the new lifecycle will be available on the queue configuration page.
To show how you might use custom lifecycles, we're going to configure an RT lifecycle to process orders of some sort. In our order example, each ticket in the queue is considered a separate order and the orders have the following statuses:
- pending
-
The order just came in untouched, pending purchase validation
- processing
-
The order is being looked at for transaction processing
- delivery
-
The order is out for delivery
- delivered
-
The order was successfully delivered to its destination
- refunded
-
The order was delivered but subsequently refunded
- declined
-
There was an error in the process validation and the order was denied purchase
In this particular example, the only status an order can start with is 'pending.' When a process coordinator chooses to take this order, it goes into processing. The order can then either be delivered or denied processing. Once denied, the lifecycle for that order ends. If it is delivered, the order can still be refunded.
The following sections walk through each part of the configuration. You can find the full configuration at the end in case you want to see the exact syntax or use it to experiment with.
Defining Status Values
Every queue has a lifecycle assigned to it. Without changing any configuration, you are given two lifecycles to choose from: "default" and "approvals." The approvals lifecycle is used by the internal approvals queue, and should not be changed or used by other queues. Do not modify the approvals lifecycle unless you fully understand how RT approvals work.
In RT 4.0, the @ActiveStatus and @InactiveStatus configurations which were previously available are gone. The logic defined by those options is now a subset of RT's lifecycle features, as described here.
A ticket naturally has three states: initial (new), active (open and stalled), and inactive (resolved, rejected, and deleted). These default settings look like this in the RT_Config.pm file:
    default => {
        initial         => [ 'new' ],
        active          => [ 'open', 'stalled' ],
        inactive        => [ 'resolved', 'rejected', 'deleted' ],
The initial state is the default starting place for new tickets, although you can create tickets with other statuses. Initial is generally used to acknowledge that a request has been made, but not yet acted on. RT sets the Started date on a ticket when it is moved out of the initial state.
Active tickets are currently being worked on, inactive tickets have reached some final state. By default, inactive tickets don't show up in search results. The AutoOpen action sets a ticket's status to the first active status. You can find more details in "Lifecycle definitions" in RT_Config.
Now we want to set up some statuses appropriate for order fulfillment, so we create a new top-level key called orders and add our new status values.
    Set( %Lifecycles, orders => {
             initial  => [ 'pending' ],
             active   => [ 'processing', 'delivery' ],
             inactive => [ 'delivered', 'returned', 'declined', 'deleted' ],
             # ...,
    });
We still use the initial, active and inactive categories, but we are able to define status values that are appropriate for the workflow we want to create. This should make the system more intuitive for users.
Transitions
The typical lifecycle follows the path initial -> active -> inactive. Obviously the path of a ticket can get more complicated than this, which is where transitions come into play.
Transitions manage the flow of a ticket from status to status. This section of the configuration has keys, which are the current status, and values that define which other statuses the ticket can transition to. Here are the transitions we define for our order process.
    Set( %Lifecycles, orders => {
        # ...,
        transitions => {
            ''          => [qw(pending processing declined)],
            pending     => [qw(processing declined deleted)],
            processing  => [qw(pending declined delivery delivered deleted)],
            delivery    => [qw(pending delivered returned deleted)],
            delivered   => [qw(pending returned deleted)],
            returned    => [qw(pending delivery deleted)],
            deleted     => [qw(pending processing delivered delivery returned)],
        },
        # ...,
    });
If a ticket is in the delivered status, it doesn't make sense for it to transition to processing or declined since the customer already has the order. However, it can transition to returned since they could send it back. The configuration above defines this for RT.
The '' entry defines the valid statuses when a ticket is created.
Deleted is a special status in RT that allows you to remove a ticket from active use. You may need to do this if a ticket is created by mistake, or a duplicate is created. Once deleted, a ticket will never show up in search results. As you can see, the system will allow you to transition to deleted from any status.
Rights and Access Control
Your workflow may have several people working on tickets at different steps, and for some you may want to make sure only certain users can perform certain actions. For example, the company may have a rule that only the quality assurance team is allowed to approve (or decline) an order for delivery.
You can apply labels to transitions and assign rights to them to allow you to apply this sort of access control. This is done with a rights entry:
    Set( %Lifecycles, orders => {
        # ...,
        rights => {
            '* -> declined' => 'DeclineOrder',
            '* -> delivery' => 'ApproveOrder',
        },
        # ...,
    });
This configuration tells RT to require the right DeclineOrder for a transition from any status (*) to declined. The ApproveOrder right is similar, but for delivery. These rights take the place of the standard ModifyTicket right, not in addition to it, so keep that in mind when creating and assigning new rights.
Once these rights are configured and loaded (by restarting the web server), they can be assigned in the web UI to groups, queues, and users. The rights show up on the rights pages in a Status tab alongside the standard RT rights tabs.
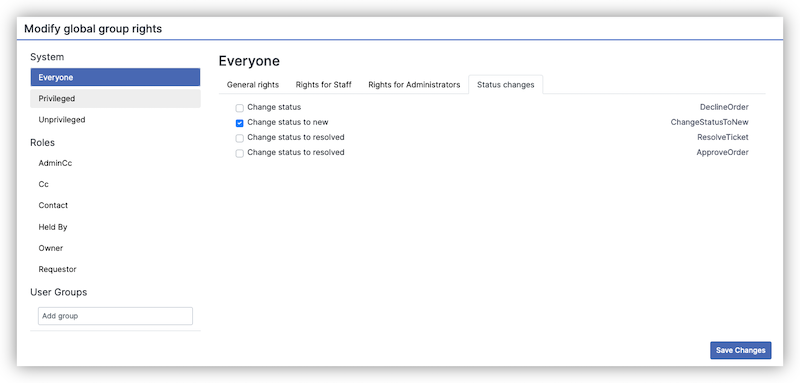
After a status transition right is granted, users with the right will see the status in the drop-down, and possibly any related actions (see "Actions").
Default Status
There are interfaces to RT from which it isn't possible to define a status, like sending an email to create a ticket, but tickets require a status. To handle these cases, you can set default status values for RT to use when the user doesn't explicitly set a value.
Looking at the defaults section in the standard RT configuration, you can see the events for which you can define a default status. For example, 'on_create' => 'new' automatically gives newly created tickets a new status when the requestor doesn't supply a status. We can do the same for our process.
    Set( %Lifecycles, orders => {
        defaults => {
            on_create => 'pending',
        },
        # ...,
    });
Only a small number of defaults are needed because in practice there are relatively few cases where a ticket will find itself without a status or in an ambiguous state.
Actions
To customize how transitions are presented in RT, lifecycles have an actions section where you can customize how an action (e.g. changing status from new -> open) looks and functions. You can customize the action's label, which is how it appears to users, and the type of update, either comment or reply. As an example, in the default RT configuration the action "new -> open" has the default label "Open it" and an update value of Respond.
Using the lifecycles configuration, you can change the label to anything you like. You can set the update option to Comment or Respond, which tells RT to process the action as a comment (not sent to requestors) or a reply (sent to requestors).
This part of the lifecycles configuration replaces the previous $ResolveDefaultUpdateType configuration value. To mimic that option, set the update type to Comment for all transitions to resolved.
Here is an example of a change we might make for our order process:
    Set( %Lifecycles, orders => {
        # ...,
        actions => [
            'pending -> processing' => {
                label  => 'Open For Processing',
                update => 'Comment',
            },
            'pending -> declined' => {
                label  => 'Decline',
                update => 'Respond',
            },
            # ...
        ],
        # ...
    });
Alternatively, supplying no update type results in a "quick" action that changes the status immediately without going through the ticket update page. RT's default "Delete" action is a "quick" action, for example:
# from the RT "default" lifecycle
'new -> deleted' => {
label => 'Delete',
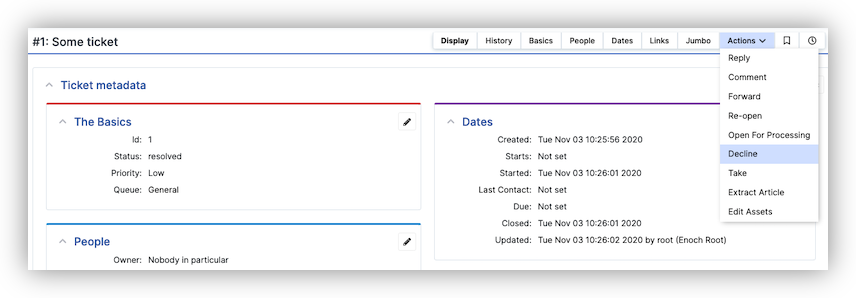
},If the transition has an associated right, it must be granted for a user to see the action. For example, if we give a group the DeclineOrder right as shown in the earlier example, members of that group will see a Decline option in their Actions menu if a ticket has a pending status. The "Full Configuration" at the end shows other action entries that make the Decline option available in more cases.
Status Colors
Each status in a lifecycle can have a color associated with it. Colors are defined as hex values (e.g. #3174ad) in a colors section of the lifecycle configuration:
    Set( %Lifecycles, orders => {
        # ...,
        colors => {
            pending    => '#80b3d3',
            processing => '#3174ad',
            delivery   => '#f0ad4e',
            delivered  => '#5cb85c',
            declined   => '#999999',
        },
        # ...,
    });
Colors can also be set in the lifecycle editor web interface (Admin > Lifecycles). When editing a lifecycle, select a status node to set its color using the color picker, or enter a valid hex color value directly. To leave a status without a color, uncheck Set status color in the editor. Statuses with no color will display as plain text rather than a colored badge.
Mapping Between Queues
As we've demonstrated, each queue can have its own custom lifecycle, but in RT you sometimes want to move a ticket from one queue to another. A ticket will have a status in a given queue, but that status may not exist in another queue you want to move the ticket to, or it may exist but mean something different. To allow tickets to move between queues with different lifecycles, RT needs to know how to set the status appropriately.
The lifecycle configuration has a __maps__ entry to allow you to specify the mappings you want between different queues. Sometimes statuses between queues don't or can't match perfectly, but if you need to move tickets between those queues, it's important that you provide a complete mapping, defining the most sensible mapping you can.
If you don't provide a mapping, users will see an error when they try to move a ticket between queues with different lifecycles but no mapping.
    Set( %Lifecycles,
        orders => {
            # ...
        },
        __maps__ => {
            'default -> orders' => {
                'new'  => 'pending',
                'open' => 'processing',
                # ...,
            },
            'orders -> default' => {
                'pending'    => 'new',
                'processing' => 'open',
                # ...,
            },
            # ...,
        },
        # ...,
    });
In the example above, we first define mappings between the default queue and our new orders queue. The second block defines the reverse for tickets that might be moved from the orders queue to a queue that uses the default lifecycle.
Full Configuration
Here is the full configuration if you want to add it to your RT instance to experiment.
    Set(%Lifecycles,

        # 'orders' shows up as a lifecycle choice when you create a new
        # queue or modify an existing one
        orders => {
            # All the appropriate order statuses
            initial         => [ 'pending' ],
            active          => [ 'processing', 'delivery' ],
            inactive        => [ 'delivered', 'returned', 'declined', 'deleted' ],

            # Default order statuses for certain actions
            defaults => {
                on_create => 'pending',
            },

            # Status change restrictions
            transitions => {
                ''          => [qw(pending processing declined)],
                pending     => [qw(processing declined deleted)],
                processing  => [qw(pending declined delivery delivered deleted)],
                delivery    => [qw(pending delivered returned deleted)],
                delivered   => [qw(pending returned deleted)],
                returned    => [qw(pending delivery deleted)],
                deleted     => [qw(pending processing delivered delivery returned)],
            },

            # Rights for different actions
            rights => {

                # These rights are in the default lifecycle
                '* -> deleted'  => 'DeleteTicket',
                '* -> *'        => 'ModifyTicket',

                # Maybe we want to create rights to keep QA rigid
                '* -> declined' => 'DeclineOrder',
                '* -> delivery' => 'ApproveOrder',
            },

            # Actions for the web UI
            actions => [
                'pending -> processing' => {
                    label  => 'Open For Processing',
                    update => 'Comment',
                },
                'pending -> declined' => {
                    label  => 'Decline',
                    update => 'Respond',
                },
                'pending -> deleted' => {
                    label  => 'Delete',
                },
                'processing -> declined' => {
                    label  => 'Decline',
                    update => 'Respond',
                },
                'processing -> delivery' => {
                    label  => 'Out for delivery',
                    update => 'Comment',
                },
                'delivery -> delivered' => {
                    label  => 'Mark as delivered',
                    update => 'Comment',
                },
                'delivery -> returned' => {
                    label  => 'Returned to Manufacturer',
                    update => 'Respond',
                },
                'delivered -> returned' => {
                    label  => 'Returned to Manufacturer',
                    update => 'Respond',
                },
                'returned -> delivery' => {
                    label  => 'Re-deliver Order',
                    update => 'Respond',
                },
                'deleted -> pending' => {
                    label  => 'Undelete',
                    update => 'Respond',
                },
            ],
        },

        # Status mapping different different lifecycles
        __maps__ => {
            'default -> orders' => {
                'new'      => 'pending',
                'open'     => 'processing',
                'stalled'  => 'processing',
                'resolved' => 'delivered',
                'rejected' => 'declined',
                'deleted'  => 'deleted',
            },
            'orders -> default' => {
                'pending'    => 'new',
                'processing' => 'open',
                'delivered'  => 'resolved',
                'delivery'   => 'open',
                'returned'   => 'open', # closest matching we have in 'default'
                'declined'   => 'rejected',
                'deleted'    => 'deleted',
            },
        },
    );
Here is an example history of a ticket following this lifecycle:
 ← Back to index