RT 5.0.6 Documentation
Query builder
- Introduction
- Basic Ticket Searches
- Customizing Search Result Fields
- Dynamic Filtering and Sorting
- Searching for Users on Tickets
- Searching on Date Fields
- Searching Custom Fields on Tickets
- Saved Searches
- Sharing Links to Searches
- Transaction Query Builder
- Advanced
- Learn More
Introduction
The Ticket Query Builder is RT's search engine. It lets you find tickets matching some (potentially very complex) criteria. There are loads of criteria you can specify in order to perform a search. Strategies for narrowing your searches to find exactly what you're looking for (and no more) are discussed below.
Newer RT versions also include a Transaction query builder, which allows you to search for specific changes or types of changes in tickets.
The Query Builder is the heart of reporting in RT, which is covered in the Dashboard and Reports document.
Basic Ticket Searches
Let's look for tickets in the "RT" queue (RT's bug tracker for itself) that have been resolved in the last year. (These examples assume it's currently mid June, 2015). To do that, we specify the search criteria (Queue is RT, Status is resolved, and Resolved after 2014-06-15) in the upper left hand section of the Query Builder.
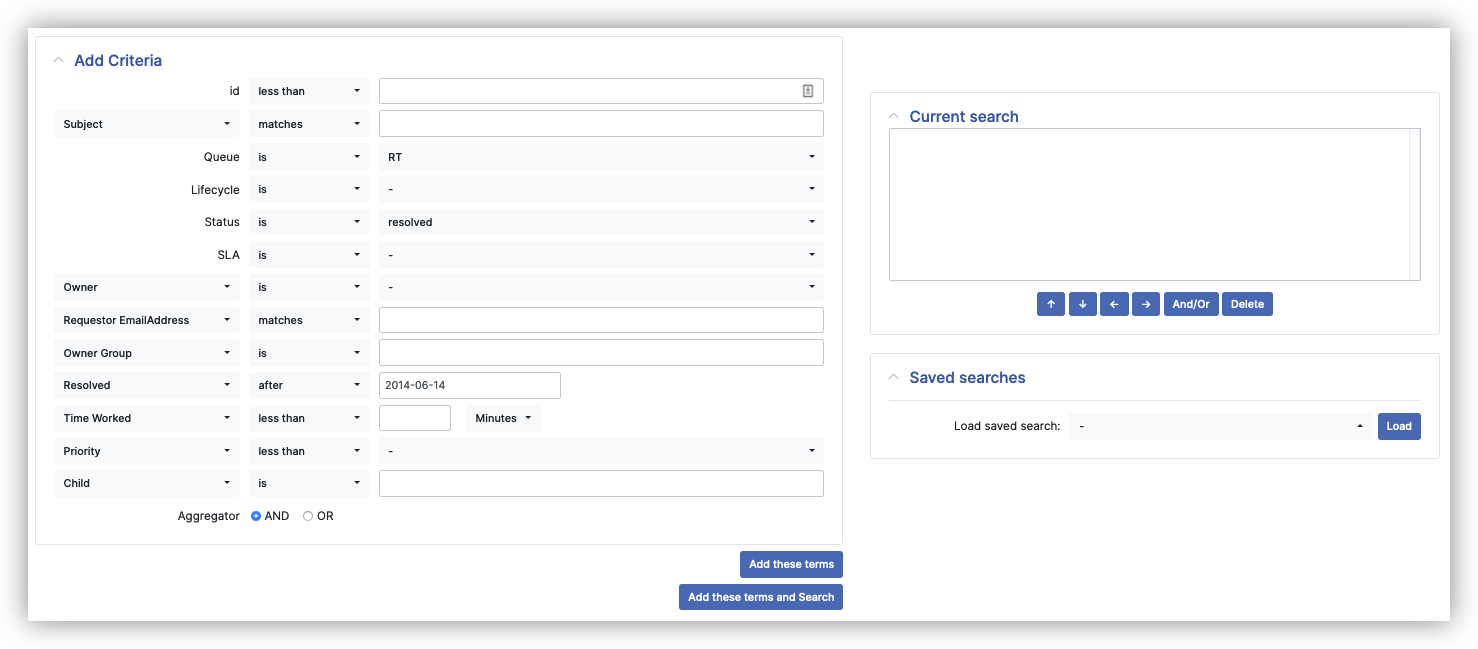
RT also has two meta-statuses, 'active' and 'inactive'. By selecting either of these from the status dropdown of the query builder, your search will include tickets in all active or inactive statuses without adding each individual status name.
The sets of active and inactive statuses for a queue are defined by the associated lifecycle. Active tickets are those listed for the 'active' and 'initial' configurations. Inactive tickets are those defined as 'inactive'. For the default RT lifecycle, for example, the active statuses are new, open, and stalled, and the inactive statuses are resolved, rejected and deleted. See docs/customizing/lifecycles.pod for more information.
After you select some criteria, you can click either Add These Terms to start to build your query.
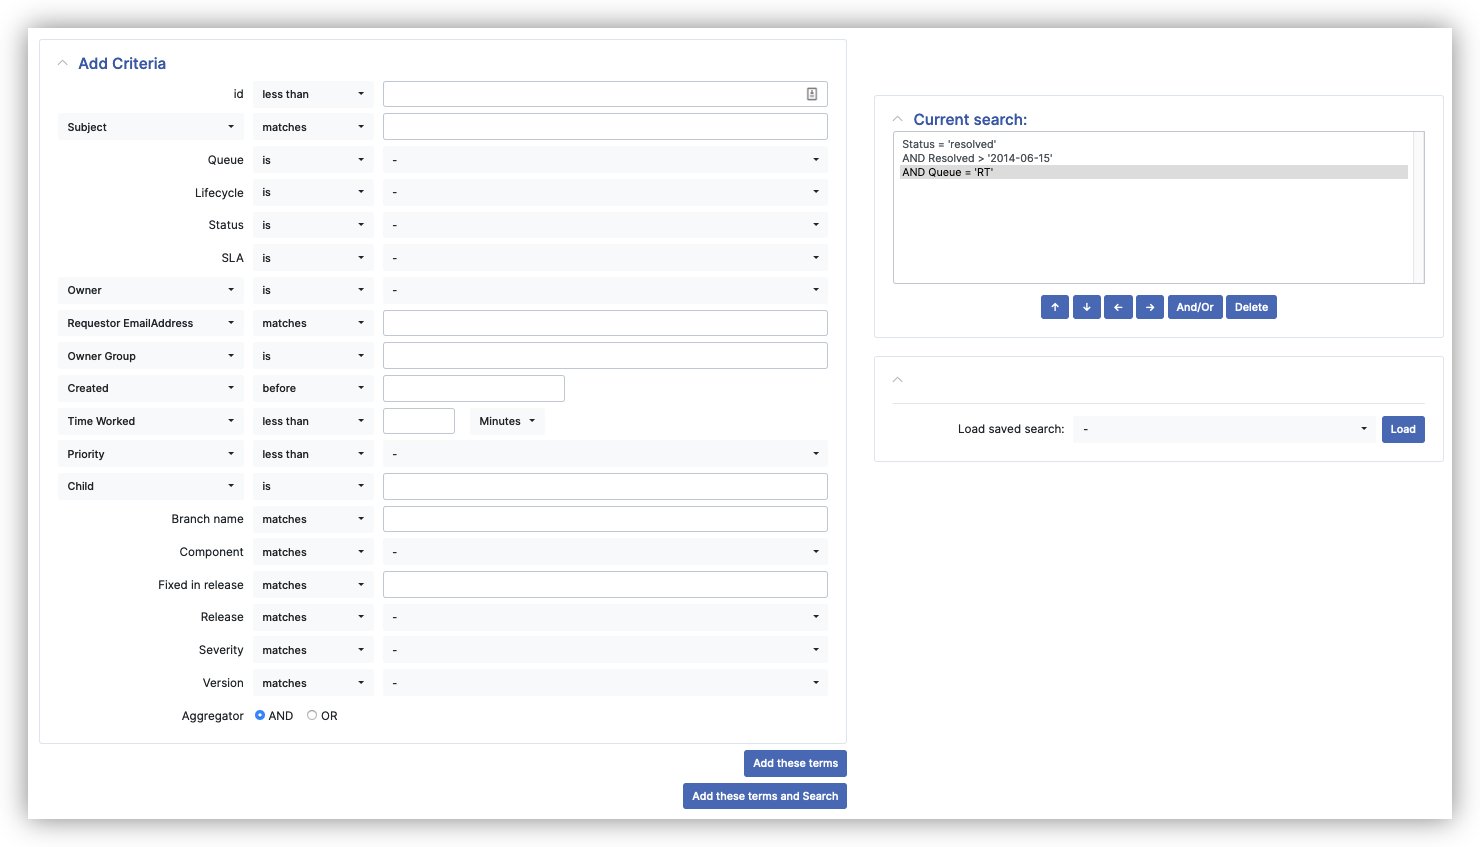
The upper right hand side presents all the logic you have specified. This view is a nice way proofread your search: Have you captured everything you want? Are there things you'd maybe prefer to leave out for now?
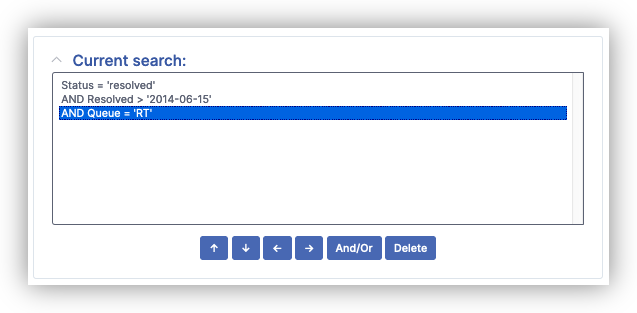
You can continue to modify and refine your search, adding or removing criteria. For example, to see all queues and not just the RT queue, you click that part of the query and click Delete.
The updated search has just the remaining criteria:
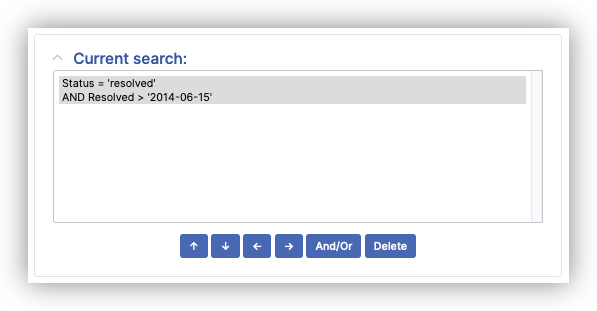
To run the search, click either 'Add these terms and Search', 'Update format and Search' at the very bottom, or Show Results in the submenu near the top.
Customizing Search Result Fields
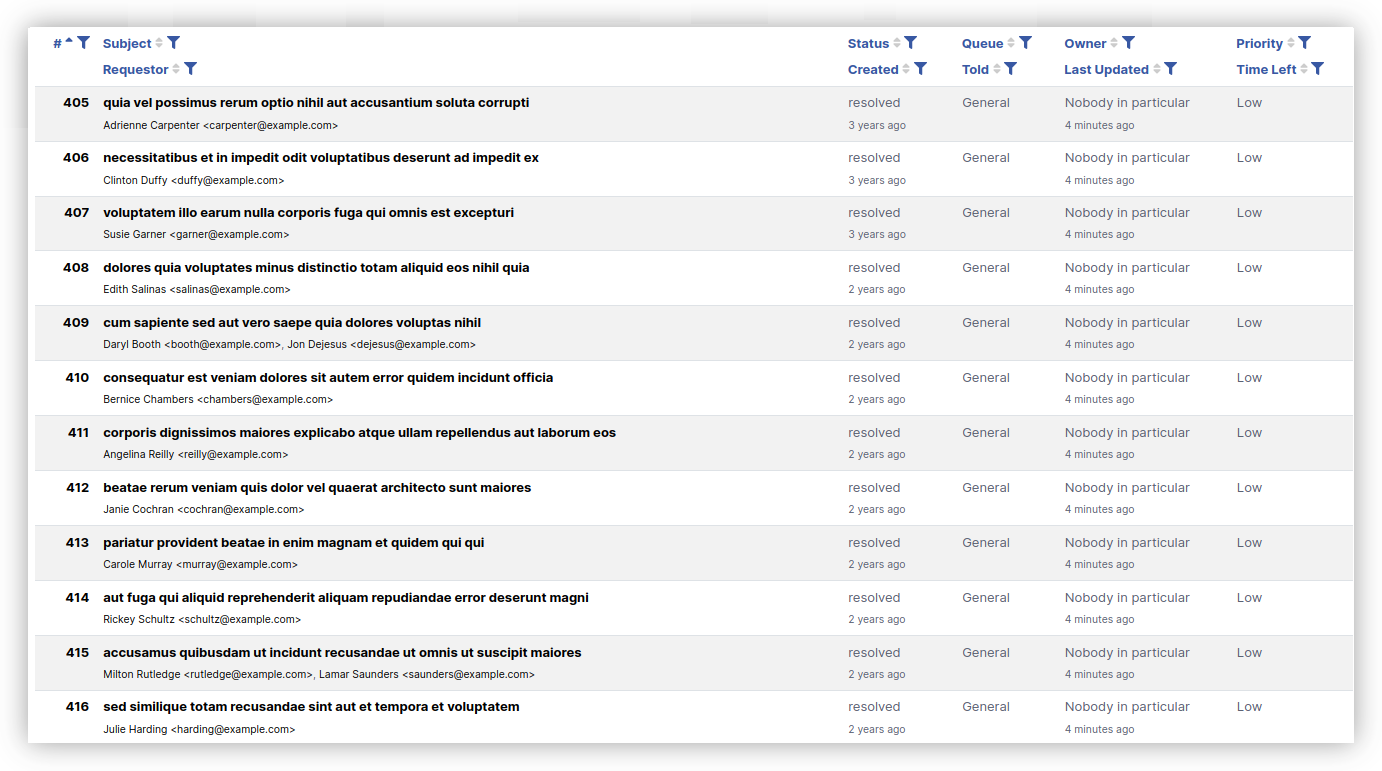
This is the default view of your results. However, like nearly everything in RT, it's configurable. You can select additional columns to appear in your results, remove columns you don't find useful, or reorder them. To change the format of search results, the bottom of the query builder page has two panes: Sorting and Display Columns.

There is more than one option for Sorting so you can view tickets in a search result set in a meaningful order. For example, let's say you start off by sorting tickets in a search by their owner. Tickets will then be grouped based on the owner name, but you may still see many tickets for each owner. To further organize the tickets owned by each user, you could add a sort by Due to see tickets sorted first by owner, and then Due date within the tickets per owner.
The Display Columns tab allows you to add or remove information displayed in the results of your search. NEWLINE indicates a line break, or new row, in how the results are displayed. NBSP for adding an empty column (such as what shows up underneath id in the following screenshot).
Here is a search with NEWLINE where it is by default:

Notice that the structure of the data that's displayed is stacked: Subject on top of Requestor, Status on top of Created, etc.. Because we're displaying a lot of information (10 fields for each ticket), including the NEWLINE helps to pack more information into the same space.
Here is that same search but without the NEWLINE:

The same pieces of information are now spread across the display next to one another. If you have users who mostly have larger displays, this might be easier for them to see.
You can use the Display Columns section to customize search results to show the most important information and also to optimize the display for users. This formatting is saved when you save a search, so you can set different formats for different searches (see "Saved Searches").
Dynamic Filtering and Sorting
After you perform a search, you can refine your results directly on the search results page. Each column header provides a way to filter and sort the results on that field.
Dynamic Filtering
To further filter your search, click on the filter icon next to the column header you want to filter by. For example, if you click on filter icon next to the 'Priority' column header, you will see a set of priority values and you can choose to see just "High" priority tickets.

These additional filter criteria are added to your search also. So if you need to click on Edit Search or Advanced to make additional changes, you will see the filters you added.
Dynamic Sorting
The sort for the current search is shown by the small arrows next to each column header. For example, in a default search the sort order is by ticket id, ascending, so lower numbers to higher. This is shown as a colored arrow pointing up next to the "#" header.
To change the sort directly from the search results, just click on the column you want to re-sort by. Clicking once will sort ascending, click again to sort descending, and click a third time to remove the sort.

If your results are already sorted by a particular field, clicking on a second field will sort the results by that field, and then by the first field. For example, if you sort by 'Priority' and then click on 'Queue', the results will be sorted by queue, and then by priority.
Searching for Users on Tickets
The Query Builder provides ways to search for tickets based on how a given user is related to the ticket. This works for all ticket roles, so you can find all active tickets where a given user is the Requestor, meaning they opened the ticket. You can also search for all tickets with a given user as the owner, meaning that's what they are working on.
Groups on Roles
Ticket roles, except for Owner, can also accept a group as a value. When you search for a user, by default the Query Builder does a recursive or "deep" search, meaning it searches the role and it checks the membership of any groups it finds in the role as well.
For example, assume you have a group "Helpdesk", the staff1 user is a member, and Helpdesk is set as an AdminCc on a ticket. If you perform this search:
AdminCc.Name = 'staff1'the results will contain that ticket.
You can also search for group names on roles. For core roles, you can select from the dropdown with group names containing "Owner Group", etc. Following the example above, if you wanted to find tickets with the Helpdesk group assigned to the AdminCc role, you can use this search:
AdminCCGroup = 'Helpdesk'You can also search for groups on custom roles using the Name value. A search for a group on a custom role looks like:
CustomRole.{Department}.Name = 'Helpdesk'Note that if you also have a user with the name 'Helpdesk', the custom role search will return all matches, so you will see tickets with both username 'Helpdesk' and the group 'Helpdesk' assigned.
Shallow Searches
In some cases you may want to see tickets only when the user you are searching for is a direct member of a role and not if they are in any groups. For that case, use the "shallow" options, like "shallow is" to generate a search like this:
AdminCc.Name SHALLOW = 'staff1'That will show tickets where 'staff1' is directly in the AdminCc role, but not the ticket from the previous example where staff1 is in the Helpdesk group on the AdminCc role.
Searching on Date Fields
As shown in the examples above, you can use any core dates on tickets in your searches. For example, to see how many tickets were created on a given day, select "Created", then "on", then click in the text box and click on a day in the calendar that pops up. Click "Add these terms" and you'll see search criteria added like this:
Created = '2023-11-29'You can also use "before" and "after", which will generate less-than (<) and greater-than (>) signs like this:
Created < '2023-11-29'When creating these types of searches, think about time getting bigger as it passes, like seconds getting added as time goes by, so tomorrow will be "greater-than" today. The query above will return tickets created before November 29 because days before that date will be "smaller".
When doing date queries, note that not all tickets will have a date set for all core date fields. Every ticket will have a Created date, but until a ticket is completed, it won't have a Resolved date. This can impact your searches and also charts where you might be calculating values. This is especially important for reporting, for example looking at a chart of tickets resolved per week and how long it took to resolve the tickets. For cases like this, include another search criteria like "Status = 'resolved'" to make sure you are reporting on tickets that all have a Resolved date set. You can also add an explicit search term to exclude dates with no value.
... AND Resolved IS NOT NULLYou can combine multiple criteria all in one search to find a specific set of tickets. For example, to find tickets created during a given week that were also resolved that week, you could use this:
    Status = 'resolved'
    AND Created > '2023-11-19' AND Created < '2023-11-25'
    AND Resolved > '2023-11-19' AND Resolved < '2023-11-25'
Date Display Options
Dates have several different display options. Many of the default search result formats use a relative display format, like "CreatedRelative". This will display dates relative to the current time, so it will show values like "15 hours ago" or "2 hours". This is helpful for dashboards supporting time-sensitive tasks, like responding to a support requests. It's easier to look at a Due value like "30 minutes" to quickly see that you have 30 minutes to respond to that ticket rather than doing the math with a date and time.
In other cases, you want to see the actual date and time rather than the relative value. You can change the display with the format settings in the Display Columns section. For a given search, find the "relative" version of the date format, like "CreatedRelative", and replace it with the regular date format "Created".
Searching with Date and Time
The examples above all use dates, but if you look at a Created date on a ticket, you'll see a date and time. RT stores date and time for all of the core date fields and DateTime type custom fields and the query builder also accepts time in searches.
To add search criteria with date and time, you can add the day using the calendar popup, then click in the box to add time. Time values take the format HH::MM::SS for hours, minutes, and seconds. So to get tickets created in a specific hour, you can use the following:
    Created > '2023-11-29 16:00:00'
    AND Created < '2023-11-29 17:00:00'
When seaching on just dates with no time, RT defaults to 00:00:00 of that day. This will usually do what you mean, but when searching a time range, you usually want to include one day past the end of your range to avoid missing a day. For example, to see November 2023, you want to search like:
    Created > '2023-11-01'
    AND Created < '2023-12-01'
That will include all tickets on November 1, because the time on tickets created that day will all be greater than 00:00:00. If you use '2023-11-30' for the end of the range, you'll miss tickets created during the day on November 30 because the Created time on those tickets will be greater than 00:00:00. The above won't include tickets from December 1 because all of those will have a Created time of 00:00:00 or later on that day.
Looking closely at the example above, you might wonder what would happen for a ticket created exactly at 00:00:00 on November 1. The > will find all tickets greater-than 00:00:00, so it would exclude a ticket created at exactly that time. To fix this, you can change the > to >=, which will also match 00:00:00 since it would be equal. The additional "equals" versions of greater-than and less-than are not available in the dropdown, but you can click on the Advanced tab to edit the query directly and add them there.
Relative Dates
You can also build search criteria with relative dates such as "today", "yesterday", "tomorrow", "last week", "next month", and even more complex dates such as "beginning of last month". These are useful when building saved searches like "Tickets Created Last Week" because the relative values will dynamically generate the dates for "last week".
To use relative dates, you can type them directly into the value field in the query builder. For example, if you want to search for tickets created during the current week, you can select "Created", "after", and type "last Sunday" and click "Add these terms". That will create a search term like:
Created > 'last Sunday'To set a range, set a beginning and end with a search like:
    Created > 'beginning of last month'
    AND Created < 'this month'
RT uses two Perl modules to interpret relative date input, DateTime::Format::Natural::Lang::EN and Time::ParseDate. You can find lists of valid relative date format in the documentation for those modules.
Searching Custom Fields on Tickets
If you use custom fields on your tickets, you might initially load the Query Builder and not see them listed. If your custom fields are applied to individual queues and not globally, they won't show up as options on a new search. However, once you add a queue to your search, as shown above, the custom fields applied to the queue or queues in your search will be displayed. You can then add custom field values to your search just like other fields.
In addition to exact queue name searches like "Queue = 'RT'", the query builder also allows 'LIKE' searches. This can be useful if you have several queues that follow some naming pattern, like "IT Support", "Printer Support", and "Email Support". To include all of these, you can use "Queue LIKE 'Support'".
Using the Advanced tab, you can also type one other criteria to search for queues by their lifecycle. TicketSQL supports "Lifecycle = 'support'" if you type it directly into the Advanced search box.
Basic Custom Field Searches
Once you add a queue to your search using one of the options above, you'll see any custom fields applied to those queues at the bottom of the list of values in the Add Criteria section. To search for all tickets with a custom field that has some value, pick the comparison ("matches", "is", etc.), add a value, and click "Add these terms" to build the search.
If you have a custom field named "Transport Type", for example, that has the values, "Car", "Bus" or "Train", you can search for all tickets that reference cars by picking "is" next to "Transport Type", typing "Car" and clicking Add these terms. You should then see a search term like:
'CF.{Transport Type}' = 'Car'For custom fields that have a dropdown with values to pick from a list, the Query Builder will show the available values as a dropdown and you can pick from the options without typing a value.
When searching for custom fields, you can also add them as a column in your search results as described above.
Searching for Empty Custom Fields
Sometimes you want to search for all tickets where a given custom field doesn't have a particular value. For example, you might search for all tickets where "Transport Type" is not set to "Car" using the "isn't" option, and that would create:
'CF.{Transport Type}' != 'Car'The search would contain all tickets in that queue with "Transport Type" values of "Bus", "Train", and no value.
To remove tickets where Transport Type has no set value, add the following to your query:
AND 'CF.{Transport Type}' IS NOT NULLSimilarly, to see all tickets where "Transport Type" hasn't be set, you can search for :
'CF.{Transport Type}' IS NULLSaved Searches
If you build a search you want to use again, you can save it using the options in the Saved searches section on the Query Builder page. You can save ticket searches, charts, transaction searches, and asset searches. In addition to being able to quickly reload these in the Query Builder, you can also use saved searches when building dashboards (see Dashboard and Reports).
There are several rights that manage access to saved searches, so some users may not see this section initially. The global rights "ShowSavedSearches", "CreateSavedSearch", "LoadSavedSearch", and "EditSavedSearches" can be granted to allow users to interact with saved searches (Admin > Global > Group Rights).
Saved searches have a Privacy setting, which controls which other users can load the saved search. The privacy setting controls only the saved search itself and doesn't apply to the tickets returned, so even if a user can load a saved search, if they don't have rights to some tickets in that search, they won't see those tickets.
"My saved searches" are just for you (the logged in user) and they can't be seen by other users. You need to grant the ModifySelf right in addition to the saved search rights above to allow users to save these.
"RT System's saved searches" are system-wide searches and can only be created and updated by users with the SuperUser right. They can be used for dashboards, but only SuperUsers can view and load them on the Query Builder page.
Saved searches can also be scoped to groups. To set up rights for group-level saved searches, find the group (Admin > Groups), then click on the Group Rights option in the submenu. You can grant "ShowSavedSearches" and "EditSavedSearch" to group members, including members of the same group you are viewing. Once added, members of that group can then load or save searches with the Privacy set to the group. You must be in a group for it to appear in the Privacy menu, and this applies to SuperUsers as well.
Sharing Links to Searches
There are several ways to share a saved search with another user, and which one you use will depend on how much you plan to use the search. The sections below refer to ticket searches, but these options also apply to saved charts.
Permalink
The easiest way to share a search is to click on the Permalink icon in the submenu and share the link (URL). Another RT user can load the search using the link and clicking Permalink will make sure it remains available in RT. However, you can't modify the search after you share the link. If you need to make a change, you can create a new Permalink and share that.
This option is good for a search you only need for a short period of time. For example, you may be working on something with a co-worker and you want to quickly show them a set of tickets you want them to look at. You can create the search that finds the correct tickets and share the link. After they load the tickets, they might make some updates (maybe resolving some tickets) and after that you no longer need the search link.
Saved Search Links
"Saved Searches" also have a Permalink created when you save them. If another RT user has rights to load the saved search, they could go to the Query Builder page and load it, but you could also click to View the Permalink and share the link. This will load the saved search for them automatically.
The Permalink for a saved search links to the saved search entry, which means if you update the saved search, anyone with the link will see the updated search when they next load it. This makes it more flexible than a Permalink directly to an ad hoc search since you can update it over time if needed and users can use the same link. Users can also always load the search from the menu on the Query Builder.
Saved Searches in Dashboards
For searches that you want users to be able to easily use often and possibly for a longer period of time, you can create a dashboard. Dashboards can contain many searches and charts and can be set as the user's home page. So useful searches like "Most Due Support Tickets" or "My Tasks for This Week" are good candidates for Dashboards. See Dashboard and Reports for more information on setting up dashboards.
Transaction Query Builder
Similar to the Ticket Query Builder, the Transaction Query Builder provides an interface to search for individual transactions. Transactions are all of the changes made to a ticket through its life. Each of the entries displayed in the ticket history at the bottom of the ticket display page is a transaction.
In some cases, RT users looking for a particular reply on a ticket will search in their email client rather than in RT because they will remember getting the email with the information they need. On a busy ticket, it can be a challenge to find the reply from Jane some time this week. The Transaction Query Builder now makes that sort of search easy.
Basic Transaction Searches
In the example above, suppose you remember getting a reply from Jane in email on a ticket and you know it was in the last week. But it's been a busy week and Jane is on a bunch of active tickets, so you're not sure where to start. With the Transaction Query Builder, you can easily create a search to show all replies from Jane.
First find Creator, select "is", and type Jane's username. The "Creator" of a transaction is always the person who made the change. For a reply, by email or in RT itself, the person who replied will be the Creator of the transaction.
Next, for Created select "after" and type "1 week ago". RT will then automatically figure out the date 7 days ago and show you only results in the last 7 days.
Finally for Type select "is" and select "Correspond". Correspond is the name RT uses internally for all replies on a ticket.
Run the search and you'll see all replies from Jane on any tickets over the last week. Note that you'll see all transactions you have rights to see, even if you aren't a watcher and possibly didn't get an email originally.
Including Ticket Information
When searching for transactions, you can also add criteria about the types of tickets the transactions should be on. In our example, we probably only want to see active tickets, so in the bottom Ticket Fields section you can select Status "is" and "Active". This will then filter out inactive statuses.
Advanced
In addition to the graphical query builder, RT also has an Advanced page where you can write and modify queries and formats directly. For example, you can type the following query directly in the Query box:
Status = 'resolved' AND Resolved > '2019-04-01' AND Queue = 'RT'and then click "Apply" to let RT validate it. RT will display any syntax errors if you make any mistakes so you can fix them.
Dynamic Search Values (Placeholders)
RT supports some dynamic search values, or placeholders, that change based on some condition in RT. One placeholder is "__CurrentUser__", which is replaced by the id of the currently logged in user when the search is run. For example, you could create a search like this:
Owner = '__CurrentUser__' AND Status = '__Active__'You can then put this on a shared dashboard and each logged-in user will see a listing of tickets they own, without having to create a separate saved search for each user. Note in the example above we also use the "__Active__" placeholder, which automatically finds all active statuses for a given lifecycle. If you look at the default RT homepage, you'll see the search "10 highest priority tickets I own" is created with exactly this search.
If you need the username of the current user rather than the id, you can use "__CurrentUserName__".
The value "__SelectedUser__" is similar and it defaults to the current user if run with a search by itself. However, if you create a dashboard, add the component "SavedSearchSelectUser", and also add your saved search, you can select a different user with the user search box on the page. Once you select a new user, all searches on that dashboard will have "__SelectedUser__" replaced by the user you selected. This makes it easy to see tickets for other people, which can be useful for a project manager or help desk supervisor to check on their team's tickets.
The default "Bookmarked Tickets" uses another placeholder, in this case as a value for "id":
id = '__Bookmarked__'That finds all tickets bookmarked by the current user. Bookmarks are added using the bookmark icon in the menu on each ticket.
These search terms can be used with additional search terms like any other search. So you could create a new saved search to show only your new or open bookmarked tickets like this:
id = '__Bookmarked__' AND ( Status = "new" OR Status = "open" )Valid Search Values
In the above example, search values like 'resolved', '2019-04-01', and 'RT' are all literal search terms: a status, a date, and a string representing the name of a queue. These are all static values that will then return matching tickets. However, sometimes you want to compare 2 columns in RT tables without knowing exact values. This is also supported, for example:
- Search tickets where LastUpdated is after (later than) Resolved
-
LastUpdated > ResolvedThis finds tickets that have been commented on or otherwise updated after they were resolved. Note that
Resolvedis not quoted, indicating that it's the relative date value from a ticket instead of the literal string "Resolved". - Search tickets where the Requestor is also the Owner
-
Requestor.id = Owner - Search tickets where custom fields Foo and Bar have the same value
-
CF.Foo = CF.BarThis is equal to:
    CF.{Foo} = CF.{Bar}
    CF.Foo = CF.Bar.Content
To compare LargeContent instead:
CF.IP = CF.IPRange.LargeContent
Learn More
To use the query builder to build and save reports, see Dashboard and Reports. For definitions of RT metadata, see Ticket Metadata.
← Back to index